


Mastering elegant artistry: How to adapt workshop skills for distinct eye shapes?

In the vibrant world of beauty, understanding the nuances of individual features is paramount to achieving truly elegant artistry. While makeup workshops provide an invaluable foundation of skills – from blending eyeshadow to mastering eyeliner application – the real magic happens when you learn to adapt these universal techniques to suit distinct eye shapes. This guide will help you bridge the gap between classroom theory and personalized, professional application.
The Foundation: Understanding Eye Anatomy
Before you can adapt, you must first observe. Every eye tells a different story through its unique structure: the orbital bone, eyelid space, brow position, and the angle of the eye itself. A crucial workshop takeaway is the ability to analyze these components. Is the lid prominent or recessed? Is there a visible crease? Does the eye tilt upwards or downwards? These observations form the basis for all subsequent technique adjustments.
Recalling color theory, brush control, and product knowledge from your workshops will be key here. Think about how light and shadow can manipulate perception. Darker shades recede, while lighter, shimmery tones bring forward and highlight. This fundamental principle is your most powerful tool in adapting techniques for any eye shape.

Refining Workshop Techniques for Unique Eyes
Almond Eyes: Enhancing Natural Symmetry
Often considered the ‘ideal’ shape, almond eyes are balanced with a slight upward lift at the outer corners. Workshop techniques for a classic smoky eye or winged liner typically suit this shape well. The adaptation here is often subtle: focus on enhancing the natural shape without overpowering it. A soft gradient of shadow from inner to outer corner, or a precise winged liner that follows the natural curve, will celebrate their inherent elegance.
Round Eyes: Creating Length and Lift
Round eyes often appear larger and more open. The workshop challenge is to avoid making them look even rounder. Adapt your shadow application by extending darker shades horizontally past the outer corner, creating a more elongated effect. When applying liner, a subtle flick upwards at the outer edge can ‘lift’ the eye, giving the illusion of an almond shape. Remember your workshop practice on precise brush angles and blending for seamless transitions.

Hooded Eyes: Opening and Defining
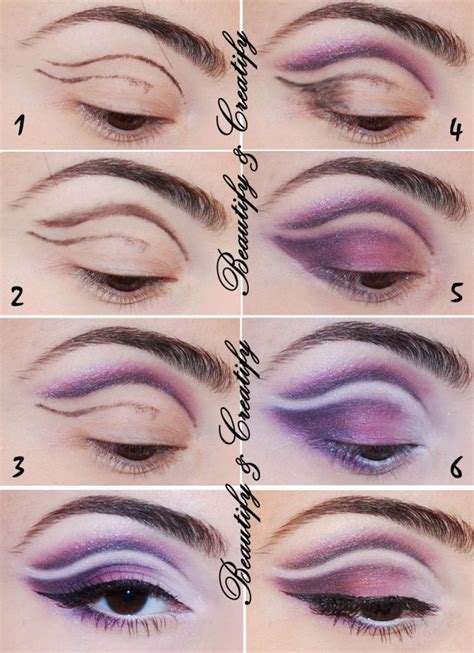
Hooded eyes feature an extra fold of skin that droops over the crease, sometimes obscuring the lid. This is where your workshop skills in ‘mapping’ the eye become invaluable. Instead of applying shadow directly into the natural crease, apply it slightly above the hood when the eyes are open to create a new, visible crease. Keep shimmer on the mobile lid and use matte, darker shades for definition in the ‘new’ crease area. Tightlining and strategically placed mascara will further open the eyes.
Monolid Eyes: Building Dimension and Depth
Monolid eyes lack a visible crease and often have a flatter surface. Adapting workshop contouring techniques is crucial here. Focus on creating dimension through a gradient application of eyeshadow, starting lighter near the lash line and gradually deepening towards the brow bone. A soft, diffused wash of color can work wonders, as can creative eyeliner techniques like a thicker wing that’s visible when the eyes are open. Practice with different brush sizes to achieve diffused yet impactful color.

Downturned Eyes: Lifting and Brightening
Downturned eyes have outer corners that point downwards. The goal is to create an illusion of lift. Your workshop skills in upward sweeping motions for shadow application are key. Apply lighter shades to the inner corner and beneath the brow bone to brighten. For eyeliner, focus on an upward-angled wing that starts from the last third of the lash line, effectively ‘lifting’ the outer corner. Avoid extending darker shadows downwards past the natural eye shape.
Upturned Eyes: Balancing and Accentuating
Upturned eyes have outer corners that lift upwards, often giving a cat-eye effect naturally. While this shape is beautiful, sometimes a more balanced look is desired. Workshop techniques for softening harsh lines or adding depth can be adapted. Consider placing a slightly darker shade on the outer lower lash line to balance the upward tilt, or keep winged liner subtle to merely accentuate the natural lift without exaggerating it.

General Principles for Bespoke Artistry
Beyond specific techniques, remember these workshop-inspired principles:
- Practice Makes Perfect: Continuously experiment with different placements and intensities.
- Use the Right Tools: A diverse brush collection, as taught in many workshops, allows for precision in different areas.
- Observe and Adjust: Always take a step back and view your work from different angles and lighting conditions.
- Client Communication: In a professional setting, ask your client about their preferences and comfort level.

Mastering elegant artistry is an ongoing journey of learning and adaptation. Your foundational workshop skills are not rigid rules, but rather flexible tools to be wielded with creativity and precision. By understanding and respecting the individuality of each eye shape, you elevate your craft from mere application to truly bespoke, beautiful artistry.